Tuesday 4 February 2014

ExplainEverything

You probably read my post about how much I love ScreenFlow!  That is my workhorse for the Mac. For my iPad, I am equally as stoked to use ExplainEverything.

If you are afraid of technology, you will make great gains by using this program. It has a simple red dot to begin recording, and this turns into a square box to end recording.

Simply start recording, talk and doodle, and everything you say and draw will be recorded. When you are done, there is an automatic upload tool so you can send this straight to YouTube.

In my disciplines, there's a lot of evaluating, considering and rough notes involved. When I map gene locations for my students, I have to create a symbol system, do sample calculations, and sketch the map.  I find that this is the best tool around for modeling the discipline. It is amazingly fast: if I want to do a five-minute production, it takes me five minutes. Uploading takes a little longer, but I just set the iPad side, and let it do its job.

You can get this from Morris Cooke. (for under $10, I think!)

QuickTime

This has been the standard video player for decades. It works on both PC and Mac. I'm including this on theMac page only, because the technology is mostly centered for that platform. QuickTime comes as a native application in the newer operating systems, and for a few years has had the ability to record the screen as you use it.

The PC version can be upgraded so you can record the screen.

I don't have a lot to say about this, because I typically don't use it. However on the few times that I have, it worked just fine.

QuickTime player is a free download.  If you have a Mac, chances are it is already preinstalled.

ScreenFlow

Hands down this is my favorite way of making a podcast. The ease with which I can capture the video on my Macintosh computer is astounding. Their are tons of options for post-production manipulation. You can add audio, strip audio, mix clips, fade in camera grabs (i.e. images of me talking) with with the screen I'm working on in the background.  And the price is amazingly reasonable. It runs less than $100(Last time I checked) and they will be happy to give you a 10% educators discount. You just have to write to them.

The company to get this program from is Telestream.

I could gush for pages about how much I like this program. As I said, it is easy to use, and amazing control with the timelines.   But rather than me tell you about it, why don't you look at one of their excellent tutorials:

Reflector

Although PowerPoint has ways to annotate the screen, I personally find it cumbersome to draw with the mouse.  I could use a stylus with the bamboo pad  and sometimes there are other input options.

Nothing beats using an iPad: you can see right on the screen what you're doing. I prefer to use a stylus for my finger, but I don't have any specific set method.

But how to get that into a blog?  Sometimes I use the program ExplainEverything for the iPad by itself.  I can just upload that directly into YouTube.

If I want to intersperse PowerPoint presentations  with diagrams and other kinds of modeling, I can use Reflector.  This is not just a Mac program, but I have not had success with it using the PC, which is why I have it on the "Mac" page of the blog.  Reflector accepts video feeds from"AirPlay"(this is an iOS method of sending video and sound to other units, like the AppleTV).  You need to run the reflector program on the computer which is to receive the signals.  I have it running on my laptop. I can use ScreenFlow to capture the desktop image and when I want to show something on my iPad, I can just activate the reflector program.

Another amazing feature is that you can consolidate several video feeds. For example, you can get up to (I think) eight student iPhones/iPad on your screen during class time. I occasionally use this to challenge the students to demonstrate a concept.  I can keep some of the video feeds on a separate monitor and pull them up as interesting things develop.

If you typically use a Windows computer, you could try this program out. Like I said, I did not have luck with this.

You can purchase Reflector from AirSquirrels.

Monday 3 February 2014

PowerPoint

Microsoft Office is one of the most ubiquitous packages available for organizing and sharing information.  It's most likely you have PowerPoint on your computer.  There are versions for both Mac and PC.

I'm not going into too much detail about this resource:  I assume you're either familiar with it yourself or you can find someone nearby who can create a PowerPoint presentation.

My only advice is that you run through the presentation and figure out what you want to say:  awkward pauses when you search for words or misspeak.  There's a notes window you can use to organize your ideas.  My trick:  when I run through the slides, I turn on voice recognition and create a script to use for when I "go live".

PointoFix

I love this for making quick screen grabs that I can mark up!  It's free but is written by a German group.  You have to load in an English translator, but it's simple to use, creates custom-sized swatches you can save or copy/paste.  If you get an error, the dialogue box may be in German, which is kind of fun.  It's available from http://www.pointofix.de/download.php.


Captivate

This software is amazingly easy to use and creates very professional looking final products.  It is quite expensive, and the output is rendered into shockwave (Flash) output. I believe you can also make movies and load them into YouTube. The advantage of using Flash output is that you can create interactivity very easily. You can create drag-and-drop exercises, multiple-choice questions, live links, and a host of other exercises.  It is available from Adobe Corporation.

CamStudio


This is a free software package that works very well.  You can download it from http://camstudio.org (they request a donation only - a very good deal).

I find it does a great job with sound recording and screen capture. It is a little bit clumsy to use, but just to get the main ideas onto the screen is pretty simple.  Essentially, I just record what I want to do on the computer and talk as I do it.  I take the finished file, and put it into YouTube. You can also create a shockwave (Flash) version, but these do not play on iOS devices (iPhone/iPad).

Sunday 2 February 2014

Hardware

Regardless of whether you use a Mac or PC, you need to get the content in there. Of course, the keyboard standard, so I will leave it alone. What if you want to add all those extra nice things like illustrations or verbalized thoughts?  Both of these are extremely powerful tools for the teaching technique known as "modelling".

Doodles

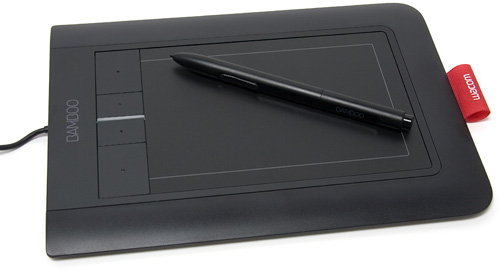
When I teach genetics, I often make use of gene symbols and sometimes calculations. These can be tricky to get into the computer using a keyboard. A low-cost solution is the use of a "Bamboo Pad" from Wacom.  It is essentially a slate that can take information drawn upon it using a finger or its stylus.  A very nice feature is that it hooks into the computer using a USB port. It works on both Mac and PC.  I haven't used mine much because there is a little bit of awkwardness in trying to gauge where to write on the slate and where the output will appear on the screen.  I got mine for less than $100. However, wireless versions are only slightly more expensive than that.

Since I got an iPad, I have never looked back. There is something very seamless about being able to see what you are drawing and being able to touch it up right on the image.  These are, of course much more expensive. I am still using a second-generation iPad. It works just fine for me, and although I am looking to upgrade, I am in no rush because it is working just fine for now. The software I use for my doodles will be incorporated in the "Mac" section of this blog.  In particular, I will gush about the software "Explain 
Everything".  With that, I can create detailed solutions as multimedia for my more challenging questions.

Audio

Most computers come with an onboard microphone. These get the job done, but typically are fairly tinny and thin.  I use the Mac microphone for my dictation, and it does a very good job. However, if I am creating audio that goes with my multimedia productions, I prefer to use my Yeti microphone.  This has several options for the various uses. You can have a solo voice input, you can do a one-to-one interview, or you could set it up for a round table discussion.  

This thing is so sensitive, I had to twist a coat hanger into a frame to support an old nylon stocking to soften the "P" sounds I make when I am speaking. Otherwise, you get a "poof" sound with some words.  

Sometimes I use a laptop computer alongside of an iPad and combine the two images.  Both machines will record all the audio, But I stripped the audio feed from the iPad because it is particularly weak. The Yeti creates a deeper, more robust sound than the iPad.

YouTube - Cue the multimedia!

YouTube is perhaps the #1 spot that students go for information that doesn't have to be read.  There's a profound amount of junk out there, but if you're looking for a walkthrough on the latest software revision (when they move around all your controls!), YouTube usually strikes gold.

Once again, I'm impressed with this site being free.  Although Google struggled a bit to monetize this after acquiring the site for $1.64 billion, they seem to have come up with a solution using AdSense revenue sharing.  Content authors get a majority of the revenue, but Google's ~40% take adds up to immense capital!

The software I use typically has a button for automatically uploading my content to YouTube. In fact, most smart phones have sharing options that direct the files directly to YouTube. Uploading can take a little while, but there are good online options in the YouTube world for image stabilization, annotation, and links. I wish I could add hot buttons right into the videos that link to specific sites, but I understand that there is potential for abuse that YouTube is not interested in addressing.

Blogging Software

Here's your megaphone.  You've got a powerful way to spread your message to the crowds.  There are multitudes of blogging software, but I'm only going to tell you about the one I use:  Blogger.  It's free and maintained by Google, meaning that it links well into searches and plays nicely with other Google enterprises, like YouTube.  Those are the two main pillars for my soapbox.

I am also on "Google+", but I admit I'm not really sure how this works.  It seems to consolidate YouTube and Blogger entries well, so matching up the two is easy.  I've never tried other software, so maybe there are better alternatives.  Wordpress is extremely popular, and I believe it's also free.  Movable Type can be purchased, and runs large sites like The Huffington Post and the BC government.   If you have success with these or other software packages, feel free to post your experience in the comments section!

I either type in my text or dictate it into my Mac using voice recognition in the Mavericks OS.  I used to be able to type faster than dictating and proofing my work, but my Mac displays the words and corrects them in real time.  My biggest complaint is that "genes" comes out as "jeans", so I am extra-vigilant for that substitution!

One more neat feature about Blogger is that you can consolidate your posts into pages.  I like to create the entries one at a time. Sometimes I don't do this in sequential order.   Moreover, because posts are arranged by date, you would have to record the posts you want at the bottom first, and work your way to the most recent entries.  I keep my posts as individual Pages so that they can be linked and shared more easily. I later string these together using the HTML (rather than Compose) editing feature.  You will see these pages at the top of this entry and all the other parts of my blog.